White Chicken Chili

by Lexi Hill

Total Time: 30 mins       Yield: 8-10 cups


I LOVE cooking. It’s one of my favorites activities (as is eating), but some days I’m just not feeling it. Days like that usually end with me ordering an artery-clogging patty melt or a burrito bigger than my head from fast food restaurants. In an effort to help me out on the days I don’t feel like cooking for myself, my boyfriend made a New Year’s resolution to learn how to cook so I could still have delicious, homemade meals that won’t leave me feeling nasty afterwards. I’m looking at you, Whataburger.

Here’s a recipe I have made tons of times, and have used as a way to teach my boyfriend a handful of basic cooking techniques that he can apply to dozens of other recipes. From this chili, he’s learned how to cook meat, chop vegetables, and season a dish… and it only takes about half an hour! Even for the most inexperienced cooks out there, this one is sure to produce a hearty and healthy meal that tastes AMAZING.

Enjoy!

INGREDIENTS:

  • 3-4 boneless chicken breasts

  • 4 cups chicken stock

  • 2 (15 oz) cans white beans

  • 2 (4 oz) cans green chilis

  • 1/2 onion, white or yellow

  • 3-4 jalapeños

  • 4 cloves garlic

  • 2 teaspoons cayenne pepper

  • 2 teaspoons cumin

  • 2 teaspoons paprika

  • Salt & pepper, to taste

DIRECTIONS:

  1. Pour chicken stock into a large pot, then add the chicken breasts. Cook over medium heat (5-6 setting on stove) for about 15 minutes. Check to make sure the meat is cooked all the way through by cutting into the middle of the breast. If there’s no pink on the inside, you’re good to go; if there is still pink, cook for a minute or two longer and check again. Repeat this checking process until there’s no more pink inside the chicken.
  2. While you’re waiting on the chicken to cook, use this time to chop up your veggies.
  3. When chicken is done, remove from the pot and shred it using your preferred method, then add it back to the pot you cooked it in.
  4. Drain your beans.
  5. Add beans and remaining ingredients to the pot. Simmer the chili (cook on low heat, 2-3 setting on stove) for about 10 minutes.
  6. Enjoy your creation!

Christmas French Toast Strata

It’s Christmas morning and I hear mom’s clanging of the coffee mugs muffled by the family room’s roar of “A Christmas Story.” The smell of cinnamon fills my lungs as my mom busily works away at her golden-brown masterpiece above the oven’s warmth. “I need twenty more minutes, girls, and then we can start,” she’d say every Christmas morning, as if that wasn’t an eternity.

With wrapping paper sprawled all over the living room floor, we dove into the rich perfection and rubbed our bellies. It was finally Christmas.

christmas-french-toast-strata

PHOTO: Taken from One-Dish Collection: 3 Cookbooks in 1- Publications International

My mom found this recipe in the “One-Dish Collection: 3 Cookbooks in 1” cookbook. From my family to yours, Merry Christmas and enjoy!

Ingredients (feeds up to 6 people):

  • 4 ounces of day-old French or Italian bread, cut into ¾ inch slices
  • 1/3 cup golden raisins
  • 3 ounces of cream cheese, cut into ¼ inch slices
  • 3 eggs
  • 1 ½ cups of milk
  • ½ cup maple syrup
  • 1 teaspoon of vanilla
  • 2 tablespoons of sugar
  • 1 teaspoon of ground cinnamon
  • Optional: Additional maple syrup

Materials:

  • 11 x7 baking dish
  • Non-stick cooling spray
  • Medium and small-sized mixing bowls
  • Electric mixer

Process:

  • Spray non-stick cooling spray on 11 x7 baking dish before layering ¾ inch bread slices evenly in dish. Dust golden raisins and cream cheese over bread slices.
  • Beat eggs with electric mixer in medium-sized mixing bowl until fully blended. Add milk, maple syrup and vanilla and mix well.
  • Pour egg mixture carefully over layer of bread slices.
  • Cover baking dish and refrigerate for 4 hours (or overnight).
  • After dish has set for at least 4 hours, preheat oven to 350°
  • Mix sugar and cinnamon in small bowl. Then, sprinkle a layer over bread.
  • Uncovered, bake for 40 to 45 minutes or until golden brown.
  • Drizzle additional maple syrup over the top for a richer taste.


Let cool, cut into slices and enjoy!

Thai Chicken Red Curry

I have been searching for a red curry recipe for years to match the one I grew up eating at family dinners in our favorite Thai restaurant. After making several variations of this recipe, my family has ruled this version, though simplistic, to be the closest I have come yet. Enjoy! – Claire Weber

Thai Chicken Red Curry
4 servings

4-5 Tbsp. prepared red curry paste
2 cans coconut milk
3 tsp. brown sugar
½ lb. chicken breast, bite size chunks
3 c. vegetables, cut bite-size
fish sauce or soy sauce to taste
cooked rice
basil (for garnish)

Combine the curry paste, coconut milk, and sugar in a large nonstick skillet or wok over medium heat. Bring the sauce to a simmer, stirring occasionally to keep the sauce from burning. Add the chicken and simmer until chicken is cooked through. Add vegetables, simmer until vegetables are al dente. Stir in fish sauce. Garnish with basil and serve with rice.

See the original magazine article format here.

Lasagna Biancardi

by Michelle Biancardi

With a name like Biancardi, I’m asked about my family’s culinary traditions quite often. In the past I’ve been sheepishly limited to admitting very little Italian-cooking knowledge, but lately I’ve been stepping into the kitchen to change that, guided by the cookbook of my Great-Grandma Biancardi, the 1950’s “Talisman Italian Cookbook” by Ada Boni.

I began cooking Boni’s “Lasagna Old Style” this past summer and have since been introducing various tweaks and twists to incorporate my personal flavor preferences. My version, which I will call Lasagna Biancardi, takes on a Southern Italian flavor profile – more heavily reliant on tomatoes and ricotta than its Northern, béchamel-based counterpart.

Our lasagna will be comprised of five main components:

1. Sauce
2. Meat
3. Ricotta
4. Oven-ready lasagna noodles
5. Mozzarella slices

You’ll find the recipe for how to make or prepare each of these components and how to assemble them detailed in the following pages.

Though a time investment, lasagna is the perfect recipe to get your friends or family into the kitchen. Not only will this recipe produce enough for 10 – 12 generous servings, but it also makes for a great Sunday meal prep. You can split the dish with a friend, and you’ll both have lasagna for days. Enjoy!

Lasagna Biancardi
Preparation Time: 1 hour, 20 minutes
Cook Time: 40 minutes
Yields 10 – 12 generous servings


Component #1: Sauce
This element needs to simmer for 45 minutes to an hour, so start here! 

Equipment
High-rimmed sauce pan

Ingredients
– 2 tbsp olive oil
– 1/2 large sweet onion, minced (Note: you’ll be using the other half for the meat component, so mince the whole thing while you’re at it!)
– 3 garlic cloves, minced
– 3 15 oz cans crushed tomatoes
– 2 tbsp balsamic vinegar
– 1/2 tsp red pepper flakes
– 1 tsp oregano
– 2 bay leaves
– 8-10 leaves of basil, chopped into thin strips
– salt and pepper (to taste)


  1. Warm the olive oil in a high-rimmed sauce pan on low to medium heat. Add the onion and simmer for 2 minutes, stirring occasionally. Add the garlic and saute for about 1 minute, being careful not to let the garlic burn.
  2. Add the crushed tomatoes, balsamic vinegar, red pepper flakes, oregano, and bay leaves. Stir the sauce to combine ingredients.
  3. Cover the sauce with lid and simmer for 45 minutes to an hour on medium to low heat (the sauce should be just shy of bubbling). Stir and check for flavor periodically, adding salt and pepper to taste.
  4. About 5 – 10 minutes before you are ready to assemble your lasagna, add chopped basil to pasta sauce and mix to incorporate the flavors.
  5. Remove the bay leaves from the sauce just before assembly.


Component #2: Meat
While the sauce is simmering, here’s how you wow the crowd.

Equipment
Medium frying pan, wooden spoon

Ingredients
– 1/2 tbsp olive oil
– 1/2 large sweet onion, minced
– 2 garlic cloves, minced
– 1.5 lbs mild Italian sausage
– 1 tbsp oregano

  1. As instructed above, warm the olive oil in a frying pan on low to medium heat. Add the onion and simmer for 2 minutes. Add garlic and saute for about 1 minute.
  1. Add the Italian sausage and oregano. Break up the sausage with a stiff wooden spoon so it’ll be crumbly when cooked. Cook the sausage until the meat is browned through and slightly crispy (Note: You may need to spoon out some of the excess fat while meat is cooking to allow meat to crisp up.).
  2. Take the meat off the heat. Cover a large dinner plate with a paper towel, and transfer the sausage onto the plate to drain excess fat.


Component #3: Ricotta
 This creamy filling makes our lasagna “Southern-style.”

Equipment
Large mixing bowl, small pot

Ingredients
-15 oz part skim ricotta
-3 tbsp shredded whole-milk mozzarella
-3 tbsp shredded Parmesan-Romano
-1 large egg, beaten
-1/2 tsp salt
-1/4 tsp ground black pepper
-8-10 basil leaves, chopped into thin strips

  1. In a large bowl, mix all the ingredients until they are fully incorporated.
  1. Transfer the mixture to a small pot on the stove and heat it through, stirring periodically. (Note: This will ease your effort spreading the ricotta during lasagna assembly.)


Lasagna Assembly
You’re almost there!  You’ll be making three layers, so divide each of the components accordingly. Reserve a quarter of Meat and Sauce for serving.

Equipment
9×13 casserole dish – or a casserole dish that fits in your microwave, sauce pan (from Component #1)

Ingredients
– 12 oven-ready lasagna noodles (or enough for three layers in your casserole dish)
– 16 oz mozzarella log, cut into very thin slices
-3/4 cup shredded whole-milk mozzarella
-Sauce
-Meat
-Ricotta
Optional garnish: chopped basil and additional shredded mozzarella

  1. Preheat your oven to 375F.
  2. Spread a light layer of Sauce on the bottom of a 9×13 casserole dish. This provides moisture to help prevent your oven-ready lasagna noodles from becoming crispy in the oven.
  3. Layer oven-ready lasagna, Ricotta, mozzarella, Meat, and then Sauce in three layers. Spoon some of the remaining sauce around the edges of the dish, making sure the oven-ready lasagna is sufficiently covered in sauce.
  4. Cover the assembled lasagna with damp paper towels, and cook in microwave on high for 10 minutes (Note: This step softens the ‘oven-ready lasagna.’).
  5. Remove the paper towels, and spread the shredded mozzarella evenly over the top layer of the lasagna.
  6. Cover the dish with aluminum foil. Transfer the lasagna to your oven, and bake for 25 minutes.
  7. Combine remaining meat and sauce on stove in sauce pan to create a meat-sauce, and simmer it
  8. on low heat.
  9. After 25 minutes, remove the aluminum foil from the lasagna and bake it for 5 more minutes, allowing the shredded mozzarella to brown.
  10. It’s ready! Remove your lasagna from the oven and let it sit for 5-10 minutes. After plating, spoon meat-sauce over each serving. If you desire, garnish each plate with basil and additional shredded mozzarella.

Chicken Spaghetti for dayyysssss

Deciding what recipe I wanted to do was an easy choice because for me food is about comfort and chicken spaghetti is a meal that reminds me of home. Everything about the dish speaks to the culture from which it came from, or at least the version that I am used to. It is a dish that is not meant for two but to be shared with friends and family. In his book, Southern Cooking, John Egerton emphasizes the point of southern hospitality in southern cooking, “The tradition of hospitality, of serving large quantities of good things to eat to large numbers of hungry people, of sharing food and drink with family and friends and even strangers, proved to be a durable tradition in the South” (Egerton, 1987). This dish is hearty, creamy, a little spicy and a casserole—all key characteristics of Southern cooking.

This recipe would be perfect for a rainy day or a full house. It is the definition of “comfort food”.

Chicken Spaghetti


Simple Falafel Recipe

img_20160909_143330

There’s some kind of magic in creating a meal out of basic ingredients. To start off with an array of raw ingredients and end with a dish is enchanting. That was my goal with this dish; to start off with the basics and finish with something decadent. Simple ingredients, simple recipe, delicious dish.

Ingredients

For Falafel:

  • 5 cups dry chickpeas
  • .5 cups chopped fresh parsley
  • .25 cups chopped white onion
  • 7 cloves of garlic
  • 2 Tbsp of flour
  • 2 tsp of salt
  • 1 Tbsp of ground cumin
  • Pinch of cayenne pepper
  • Extra Virgin Olive Oil

For Sauce:

  • 1 cup of tahini paste
  • 3 cloves of garlic
  • .5 of a lemon
  • .5 tsp salt
  • .2 tsp fresh parsley

For Dish:

  • Package of naan bread

Instructions

The falafel is fairly simple. Rinse chickpeas and toss them into a food processor with the parsley, white onion, and garlic. Add the flour, salt, ground cumin and cayenne pepper before mixing. You want it to look like a paste with few chunks.

Once it is fully mixed, put the mixture into a bowl and let it sit in the fridge for one hour. While it’s sitting, put all the sauce ingredients into the food processor and blend until it is sauce-like (simple enough!).

Once the falafel mixture has cooled, form into small discs. Grab a pan and the olive oil and cook the falafel on each side on medium heat for about 2-3 minutes.

Now serve! Place the falafel on naan bread and pour the sauce on top. Add tomatoes and red cabbage if you’re feeling adventurous!

LOMO SALTADO

CHECK THIS OUT IF YOU WANT A LITTLE CULTURE IN YOUR LIFE

I’ll never forget the Summer of 2016. This was a Summer filled with community, memories and magic. I was working full-time at the Magic Kingdom for a Mission Trip with 43 other people from across the U.S. We all had Wednesday off and decided to travel out of our comfort zones for dinner. We were given the task to prepare international dishes and I had the pleasure of making a Lomo Saltado (Peruvian beef stir fry) with 10 other people. If you’re a person who likes dishes with numerous flavors, texture and color then you’re in for a treat! This dish involves a few things happening at the same time so get your friends to help and get cooking! Let’s take a journey and fuse the latin and chinese cuisine into one

Ingredients:

For the baked fries:

  • Canola oil/non-stick cooking spray
  • 2 medium potatoes
  • 2 tsp of olive oil
  • ½ tsp garlic powder
  • Black pepper and sea salt

For the beef:

  • 1lb of lean beef sirloin
  • Sea salt
  • Black pepper
  • 2 tsp of olive oil
  • 1 medium onion, sliced into thin strips
  • 1 large yellow bell pepper
  • 1 large jalapeno, ribbed and seeded, sliced
  • 2 cloves of garlic, crushed
  • 2 tomatoes sliced into wedges
  • 3 tbsp of soy sauce
  • 2 tsp of apple cider soy sauce
  • ½ cup of chopped cilantro

Directions:

  • Preheat the oven to 400°F. Lightly coat a baking sheet with cooking spray.
  • Cut the potato lengthwise into 1/3-inch thick slices; cut each slice into 1/3-inch fries. Place on the baking sheet and toss with oil to evenly coat. Season with garlic powder, salt and pepper. Place on a single layer onto the greased baking sheet. Bake uncovered on the lower third of the oven for about 25 minutes or until tender crisp and golden.

Meanwhile

  • Season meat with salt, pepper and cumin.
  • Heat a large wok over high heat. When hot add the oil and the steak, cook about 2 minutes, until browned on both sides. Add the onions, bell pepper, jalapeno and garlic and cook 2 minutes.
  • Add the tomato, soy sauce and vinegar and cook 1 more minute. Season with more salt as needed, remove from heat and finish with cilantro. Serve immediately with french fries and divide evenly between 2 plates.

Fiesta Chicken

Fiesta Chicken

Serves 2-3

Ingredients:

  • 1 can of black beans
  • 1 can of regular corn
  • 1 can of Rotel (spicy if desired)
  • 1 package of Philadelphia original 8 oz. cream cheese
  • 1 packet of dry Hidden Valley Fiesta Ranch mix
  • 2 small chicken breasts


Instructions for cooking:

Take all ingredients and place in a crock pot at low heat (if faster cook time is preferred set crockpot to high heat), stirring occasionally. After 3 hours pull out the chicken breasts and pull apart either using your hands or slicing thinly with a knife. Once chicken has been pulled apart, place back into crockpot and stir in. The dish should be ready within 6 hours if cooked on low heat. If cooked on high heat it will be ready in 4 hours, pull the chicken apart after 2. Once the meal is ready pour into bowl and eat with tortilla chips- Tostitos Scoops work really well!

“Zoodles” – The Healthy Alternative to Pasta

“Zoodles” and Pesto Sauce

SERVING SIZE: 2 PLATES | TOTAL TIME: 15-20 MIN.

Ingredients

2-3 ZUCCHINIS

2/3 CUP OLIVE OIL

2 CUPS PACKED FRESH BASIL LEAVES

2 CLOVES GARLIC

¼ CUP PARMESAN CHEESE

SALT (TO TASTE)

PEPPER (TO TASTE)

YOU WILL NEED

1 SPIRAL VEGETABLE SLICER/CUTTER

1 BLENDER/FOOD PROCESSOR

1 POT TO BOIL WATER

1 COLANDER

1 MIXING BOWL

SERVING BOWLS

Directions

Start preparing the pesto sauce by adding the garlic and basil leaves into a blender/food processor until they are fully chopped.  Then add the parmesan cheese and olive oil into the processor until smooth.  Set aside the pesto sauce in a mixing bowl.

To prepare the zoodles, use a spiral vegetable slicer/cutter to slice the zucchini to resemble a noodle.  Boil the zoodles for just one minute, drain the water, and set aside.  Heat the pesto sauce for just one minute in the microwave and then mix it in a bowl with the zoodles.  Add salt/pepper to taste.  Enjoy!

crêpes + cinnamon sugar peaches

screen-shot-2016-11-03-at-4-31-32-pm

Crêpes evoke Parisian cafes and French accents, but I first learned how to cook the French pancakes in an Italian middle school.

My family moved to Florence when I was going into 6th grade and my brother and I both enrolled in Italian public schools. My middle school building was covered in graffiti and the maps in our classrooms still included the USSR. I remember walking in on the first day, tearfully departing from my dad and sticking out like a sore thumb. Soon, though, the intimidating building became more familiar and comfortable.

I’m sure at the urging of my mom, I took an after school cooking class one semester to improve my language skills and make friends. We met in the school’s dusty basement, cluttered with boxes and boxes of records, tests, and other documents that probably should not have been tossed in a basement. At the back of the room, a small, rudimentary kitchen provided the space for our culinary adventures.

We learned all the staples of the Italian diet, from pasta dough to margherita pizzas. Our teacher taught from her own experience, often forsaking written recipes. I did my best to follow along but my Italian cooking vocabulary was rusty, at best. When the class ended, I did not have much to show for it, except for one dish: crêpes.

I immediately wrote down what I remembered doing in class that day and began tinkering with the recipe, determined to translate the fluid movements of my teacher into a structured recipe I could copy. Unlike their cousin, the pancake, crêpes are almost paper-thin and are eaten folded up, like a delicate sandwich. It can seem like an intimidating dish, but I’ve found it to actually be simple and quick, an easy feather in your culinary cap.

For the past seven years, I’ve been following my middle school recipe but have learned how to feel out the best crêpes. Sometimes, more milk is necessary. Often, I add extra flour, a dash of cinnamon, or a sprinkle of garlic. crêpes are endlessly versatile and will be a welcoming friend for any meal, any season, or any appetite.

Last summer, I returned to Italy for the first time since we left. I spent ten weeks in Florence, living by myself and working for a local English-speaking news magazine. Toward the end of the summer, when my budget was low and groceries were not a priority, I discovered I had all I needed: one egg, some flour, a little bit of milk, and a smidge of butter. Plus one peach. I would come home from work, wait for the July heat to simmer away in the evening, and eat crêpes with fresh peaches and a jar of Nutella in hand’s reach.

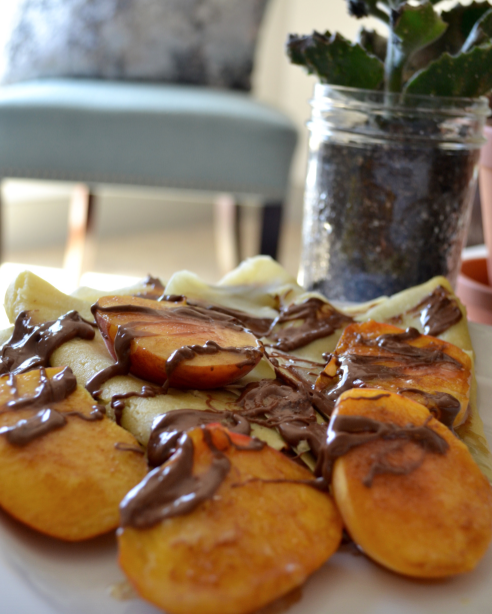
This is my twist on that beloved summer recipe. When I think of crêpes, I’m taken back to the hills of Tuscany and sweet summer evenings. While I opted for a sweet crepe in this recipe, the options are endless. Add different fruits, experiment with adding cheeses, smooth pesto on top, toss in all kinds of spices. This recipe is the most basic crêpe recipe you will probably find, the perfect blank canvas for your cooking whimsy.

screen-shot-2016-11-03-at-4-33-55-pm

Cook time is 20 minutes. Makes 5 crêpes. Cinnamon sugar baked peaches adapted from I Heart Naptime

Ingredients

For the crêpes:

1/2 cup flour

1/3 cup milk

one egg

1 1/2 tablespoons butter

For the peaches:

2 peaches

2 tablespoons brown sugar

1 teaspoon cinnamon

1/2 tablespoon butter

Instructions 

For the crêpes:

1. Mix the flour and milk until there are no lumps and the consistency is on the runny side. When you pour the mixture, it should pour easily and quickly.

2. Next, whisk in an egg until it’s completely blended with the flour and milk mixture.

3. Finally, soften butter in the microwave before mixing it in with the other ingredients.

4. If you want to add any spices, do so now. For savory crêpes, I like to add a pinch of salt or garlic. With sweet crêpes, try cinnamon, a splash of vanilla, or a sprinkle of sugar.

5. Keep the stove on medium to low heat. Crepes cook quickly, so keep everything close to the stove so you can easily transfer food from the stove to a plate. If you don’t have a crepe pan, any large pan will do.

6. Pour medium amounts of batter into the pan for each crêpe. If you don’t have any tools for spreading out the batter, take the pan off the stove and move it up and down until the batter has spread out, covering as much surface as possible.

7. Let it cook for several seconds until the batter darkens and starts to bubble. Flip it over, let it cook for a few more seconds, then slide it onto a plate. 

For the peaches:

1. Preheat oven to 375 degrees. Ideally, let the peaches bake while you cook the crepes on the stove.

2. Slice your peaches into large slices.

3. Lay them out on a cookie sheet or in an oven-safe dish. Place a small pat of butter on each slice.

4. Mix the brown sugar and cinnamon in a small bowl then sprinkle the mixture generously on each peach.

5. Bake for 8 to 10 minutes.

I highly recommend topping off the dish with a healthy amount of Nutella drizzled on top. Originally published on courtneyrunn.wordpress.com