soft chocolate chip cookie recipe by HyeJi

Chocolate chip cookies are one most generally loved sweets. I love chocolate chip cookies but most of them that are in the markets are too sweet for me. I know basic knowledge about baking so I tried to make chocolate cookie on my own a year ago and it worked out great. It had deep chocolate taste and moderately sweet. I tried many different versions, one with chocolate chip on top or one without chocolate chip and just the cacao taste. The cookie itself does not contain a lot of sugar, so it was better to stick some chocolate chips as topping. It is softer than normal cookies and can be used in making cakes such as cookie cakes. This is optional. Its tastes differ by what cocoa powder you use. I use tall house cocoa powder. It will make about 20 cookies. The directions are easy to follow and you can find all the ingredients at any grocery store. Make your own cookie and enjoy it!!

Ingredients :

  • Butter 100g
  • Sugar powder 120g
  • 2Eggs
  • Cocoa powder 30g
  • Milk 30g
  • Bake flour (normal flour is okay) 180g
  • chocolate chips

Directions :

  • Micromave butter for 30 secs to melt and put in large bowl.
  • Add sugar powder.
  • Add 2 eggs total but put in one egg and mix completely before adding another egg.
  • Add cocoa powder and mix well
  • Milk is optional, but it gets softer with milk added.
  • Sift bake flour and mix well until the mixture looks like a dough.
  • Place the oil paper on flat oven pan and put the mixture into pastry bag and squeeze on the oil paper. The shape does not matter but it cannot be too high. (I will include the photo I made).
  • Stick some chocolate chips on the squeezed cookie dough to add some more sweet taste.
  • Pre-heat the oven in 320F and bake for 10 mins.
  • Enjoy your delicious chocolate chip cookies!!

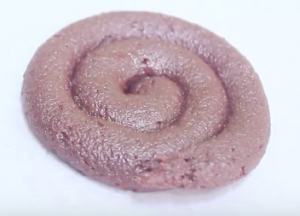
 this is the shape of cookie dough I made.

Chili-Lime Chicken

Chili-Lime Chicken

This is a wonderful, tasty, dish that is easy to make and only takes about 20-30 minutes to cook. It is my own spin on a common dish; chili-lime chicken. I chose this dish because all the ingredients are either common or cheap, making it the perfect meal for any college student. I added a kick to it to spice things up, as well as giving the chicken an assortment of vegetables. (Serve with vegetables for a healthy meal, or just use the marinade for a delicious piece of meat).

Serves: 2


Ingredients

1 lb. chicken

Marinade:

2 tbsp. Olive Oil

1 ½ tsp Chili Powder

½ tsp Cumin

¾ tsp Salt/Pepper

2 tbsp. Lime Juice (Optional: 1 Lime Zest)

1 tsp Cilantro

½ tsp Garlic Powder

½ tsp Onion Powder

Other:

2 tbsp. Olive Oil

1 tsp Chili Powder

½ tsp Salt/Pepper

2 Bell Peppers (Sliced)

¾ Onion (Sliced)

Optional: 2 Jalapenos (Sliced)


Instructions

  1. Mix the marinade together and coat the chicken
    1. Let sit for at least 30 minutes
  2. Heat the pan to Medium/High heat & add 1 tbsp. Olive Oil
  3. Put coated chicken on pan for 5-7 minutes covered
  4. Season vegetables with remaining chili powder, salt, and pepper
  5. Add the remaining olive oil & the vegetables and flip the chicken
    1. Cook 5-7 minutes covered
  6. Remove from heat once the chicken and vegetables are fully cooked.
  7. Serve immediately or refrigerate, Enjoy!

Spaghetti Carbonara

Recipe by Matthew Kimm

This is a simple, delicious dish. If you’ve never had carbonara, it may sound odd–breakfast food and pasta? It works, and it works well. The pasta soaks up the flavors of the onion, garlic, and bacon in a delicious cream sauce, best served with a hearty topping of parmesan cheese.

This is one of the first meals that comes to mind when I find myself really hungry. It’s a cheap meal that’s good and good for you. Well, no, it’s not exactly the healthiest meal but it is absolutely delicious and quite easy to make. It’s a hearty meal that should provide you leftovers for days. What it lacks in nutrition it makes up for in tastiness.

Ingredients (serves six):

  • 1 pound (1 package) of spaghetti
  • 1 White Onion
  • 2 Cloves of Garlic, minced
  • 6 slices of bacon
  • 6 eggs
  • ½ cup of Parmesan cheese
  • Pinch of salt
  • Pinch of black pepper
  • 1/4 cup heavy cream (optional)

Instructions

1. Boil water for the spaghetti.

2. While the water is boiling, chop the white onion and the slices of bacon into small pieces. Mince the garlic. Separately, whisk the eggs and the cream and set aside.

3. Add spaghetti to the boiling water. Cook for the box’s recommended amount of time.

4. Add the onion, garlic, and bacon into the skillet or saucepan. Cook on medium heat until the onions are translucent and the bacon is at your desired crispness. This should take at least five minutes, but the cooking time is dependent on what type of pan you are using. If you are about to overcook the onions and bacon before the pasta is ready, turn off the heat.

5. After the pasta finishes boiling, drain the pasta and add the pasta to the skillet or saucepan with the garlic, onions, and bacon. Pour the egg/cream mixture on top.

6. With the heat on medium low, stir the pasta together with the other ingredients until they are spread evenly. Do not allow the eggs to cook and stick to the bottom of the dish. As soon as the eggs just begin to curdle, turn the heat off.

7. Add salt, pepper, and parmesan. Toss again. The dish is ready.

8. Serve with a sprinkle of parmesan and black pepper on top. Enjoy.

Granny Goldstein’s Pound Cake Recipe

Whether you are baking for a birthday, bringing a treat to a friend, or just making dessert, this pound cake recipe is sure to be a hit for any crowd. Pound cakes originated in the 18th century in Britain and they got the name “Pound Cake” because the original recipe called for a pound of each ingredient: sugar, butter, flour, etc. Over time, the recipe has called for less of each ingredient, but still maintains the same rich flavor the original contained. This recipe has been one of my all time favorite family recipes since I was a little kid, requesting it at every birthday celebration and every family dinner. It serves as a great dessert and even breakfast, when you are craving something sweet. I suggest cutting up strawberries and pairing them with this recipe, but you won’t go wrong if you eat it plain or wash it down with a glass of milk. Enjoy this Goldstein family favorite!!

Granny Goldstein’s Pound Cake Recipe (Serves 12 people)

Ingredients:             

3 cups cake flour (Swans Down)

3 cups sugar

6 eggs

3 sticks of salted butter; room temperature (1.5 cups)

1 bar of cream cheese (8oz)

2-teaspoon vanilla

Everything Else You Need:

Bowl

Mixer

Spatula

Measuring Cup

Flour Sifter

Baker’s Joy

Tube Pan 

Oven

Getting Started:

Preheat over to 325* F and spray Tube Pan with Baker’s Joy

Instructions:

Step 1: Beat room temperature butter and cream cheese (make sure whipped good)

Step 2: Add sugar and keep mixing

Step 3: Sift flour three times 

Step 4: Alternate adding eggs and flour into the mix

Step 5: Add vanilla

Step 6: Make sure mixed well and pour mix in pan

Step 7: Bake for 1 hour and 45 minutes 

Step 8: Remove from oven, wait for cake to cool, then flip over, and enjoy! 

Ice Cream Dream

Even today, my grandmother remains one of the best cooks I know. From appetizers to desserts her food never ceases to amaze me. Many of my memories consist of spending long hours with her in the kitchen serving as her side kick when she needed someone to crack the eggs or butter the pan. Having served as my mentor, my grandmother taught me most of what I know about cooking. The one dish of hers that I often recall is her unique ice cream sandwich pie or what I like to call the “Ice Cream Dream”. This flavorful dish takes a frozen dessert to a whole new level. Requiring nothing but a 9×13 dish and a freezer, nearly anyone can make it. The “Ice Cream Dream” is perfect for a hot summers day and a great way to follow up dinner. I can promise your inner sweet tooth will not be let down.

Serving size: 18

Time: 25 minute prep; 30 minutes to freeze

Ingredients

  • 1 12 count box Blue Bunny Ice Cream Sandwiches (or any preferred brand)
  • 1 12 ounce tub fat-free frozen whipped topping
  • 1 16 ounce pkg. frozen sweetened strawberries or fresh strawberries (fresh strawberries preferred)
  • 1 jar hot fudge ice cream topping, warmed

Directions

  • In a 9×13 dish, line the bottom of dish with ice cream sandwiches
  • Spread the thawed frozen/or fresh strawberries over sandwiches
  • Spread frozen whipped cream topping over frozen strawberries
  • Freeze pie for 30 minutes
  • Warm fudge in microwave for 30 seconds
  • Top with fresh strawberries and hot fudge before serving

Chocolate Oatie No Bake Cookies

Chocolate Oatie No Bake Cookies

Makes 2 dozen

Both my mom and my grandmother inspired this recipe. I can recall many occasions growing up when I would arrive at my grandparents house and rush straight to these cookies, leaving the hello hugs as an after thought once my taste buds were satisfied. As I grew older, I began to fix these for my siblings on a slow Saturday or a long summer afternoon. Now I love making this dish because I have so many happy childhood memories associated with it. No oven needed; hope you enjoy these cookies as much as I do!


Ingredients:

  • 1/2 C Butter
  • 4 Tbsp Cocoa
  • 1/2 C Milk
  • 2 C Sugar
  • 1/2 C Peanut Butter
  • 3 C Quick cooking Oats
  • 2 tsp. Vanilla

In a saucepan, add your butter, sugar, milk and cocoa. Bring this mixture to a full boil, and boil for about 1 minute. Next, stir in your peanut butter, oats, and vanilla. Once all of your ingredients are completely mixed together, use a spoon to scoop out small-medium sized lumps and place them on wax paper at an equal distance apart. Let the lumps cool. Once the cookies have hardened, enjoy!

Karaage (Japanese Fried Chicken)

Studying abroad in Japan naturally led me to trying out new foods. In Osaka, Japan, I discovered the wonders of Japanese fried food. Within the bustling Namba ward of Osaka, there were these succulent pieces of chicken with a slight crisp on the outside that were ever so pleasant to bite into.  This Japanese fried chicken, or karaage, left a deep impression in my mind. Never had I ever had such juicy chicken in my entire life, and it took less than 15 minutes to cook after dredging it. Most people would imagine fried chicken as being salty, but karaage was different. While it does have some saltiness, the lemon helps cut straight through that flavor. The chicken thigh itself was tender which contrasted the perfect crispy fry on the outside. When I had this chicken, I knew I wanted to try to reproduce it at home.

The best part of karaage is the ease of preparation and the scale at which it can be produced. A week’s worth of protein can be prepared and served with just rice. For college students, this can be especially desirable once they have learned to fry food. Karaage is notably also included in many lunch boxes sold in Japan and a staple of a loving mother’s homemade lunch box as well.


The Recipe

Adapted from Namiko Chen’s recipe
Prep time: 15 minutes
Cook time: 15 minutes
Serves: 3-4 people

Ingredients

  • 1 lb. chicken thigh without bones
  • Sea salt
  • Freshly ground black pepper
  • ¼ cup corn starch (potato starch, or katakuriko, gives a crunchier coating)
  • ¼ cup all-purpose flour
  • Oil (high smoke point oils like vegetable, corn, sunflower, and peanut work)
  • Lemon wedges

Marinade

  • 1 inch ginger
  • 8 garlic cloves
  • 1 tbsp. soy sauce
  • 1 tbsp. sake (or dry sherry)
  • 1 tsp. sugar

Tools

  • 8 inch knife
  • A cutting board
  • 2 bowls for mixing
  • Plastic wrap
  • A half wok or pot (woks are safer!)
  • Tongs
  • Grater
  • Plate with paper towel
  • Thermometer for frying (strongly recommended)
  • Garlic presser (optional)

Marinating the Chicken

1: Begin by cutting the chicken thigh into pieces that are about 2 inches each. Make sure that all of the pieces are the same size so that the fry will be even. Feel free to remove any amount of fat to preference at this step.

2: Place the chicken into a bowl and season with sea salt and black pepper.

3: Grate the ginger with the grater and mince the garlic. A garlic presser or using the flat side of the knife to crush the garlic is fine.

4: Combine the ginger, garlic, and other marinade ingredients in the bowl with the chicken. Ensure that all of the chicken has some of the marinade coating it.

5: Cover the bowl with plastic wrap and let it rest in the refrigerator for at least an hour. Longer is better, because the marinade will soak into the chicken.

Frying the Chicken

1: Get a wok or pot and put about an inch of oil in it. Less is possible but requires moving the chicken more to get an even fry for a longer duration.

2: Set the stove on high, heating up the oil to about 360°F.

3: While waiting for the oil to heat up, the starch and flour can be mixed together in one bowl and then added to the bowl with the chicken. The mix does not have to be perfectly even as it results in different textures for each piece.

4: Check if the oil is ready. This can be done by putting in a bit of the flour-starch mixture and seeing if it bubbles or by using your thermometer to check the temperature.

5: Put about 3-6 pieces of chicken into the oil slowly. Avoid overcrowding the wok or pot. Putting too much chicken into the oil will lower its temperature resulting in soggier chicken.

6: Cook the chicken for about 90 seconds while maintaining the temperature. More chicken can be added if the temperature of the oil needs to be lowered. If the oil is smoking, the temperature is definitely too hot and must be turned down. If there are absolutely no bubbles coming up to the surface, the temperature is too low.

7: Remove the chicken when it is a light golden brown color and put it onto the plate with the paper towel. Do this for the rest of the chicken before frying a second time.

8: Fry the chicken for a second time for about 45 seconds or until it is a nice golden brown color. Place back onto another plate with a paper towel when done.

9: Serve the chicken with a wedge of lemon.

Spaghetti and Spicy Turkey Meatballs


Spaghetti and Spicy Turkey Meatballs

Adapted from Ina Garten’s “Real Meatballs and Spaghetti”

I have always loved spaghetti and meatballs.  Since I was a child my mother would make this dish for my brother and I, and it was a great break to the monotonous stream of Iranian food that we would normally eat.  Spaghetti and meatballs are a simple yet delicious staple that anyone can enjoy.  It is also an extremely versatile recipe because it can be made with almost any meat, including beef, chicken, turkey, or pork.  Another aspect to the versatility of this dish is the fact that you can change almost any part of the seasoning, including adding your own seasonings, and it will still taste delicious.

For meatballs:

1 lb Italian seasoned ground turkey

1/2 cup panko breadcrumbs

1/2 cup shredded mozzarella

1/2 cup grated parmesan

1/2 cup chopped parsley

1 egg

1 1/2 tablespoon garlic powder

1 1/2 tablespoon onion powder

1 1/2 tablespoon Italian seasoning

1 tablespoon paprika

1 tablespoon crushed red pepper flakes

1 tablespoon fresh ground black pepper

1 tablespoon salt

Olive oil

Vegetable oil


For sauce:

1 (28 ounce) can tomato puree

1 cup chopped white onion

3 cloves minced garlic

1/4 cup chopped parsley

1/4 cup chopped basil

1 tablespoon crushed red pepper flakes

1 tablespoon fresh ground black pepper

1 tablespoon salt

Grated parmesan


For serving:

1 pound thin spaghetti, cooked according to package directions

Grated parmesan

Chopped parsley

Chopped basil


Directions:

Place ground turkey, breadcrumbs, mozzarella, parsley, egg, garlic powder, onion powder, Italian seasoning, paprika, red pepper flakes, black pepper, salt, and a drizzle of olive oil in a mixing bowl.  Thoroughly mix together with wet hands.  Form the mixture into roughly ping pong ball sized meatballs.  You should end up with about 20 meatballs.

Pour equal amounts of vegetable and olive oil into a pan to a depth of about 1/4-inch.  On medium-high heat, place the meatballs (in batches of 4 or 5) into the oil and brown on all sides.  Do not cook the meatballs all the way, and do not put too many in the pan at once.  After each batch is done browning, place the meatballs on a plate covered in paper towels.  Discard most of the oil but don’t clean the pan.

To make the sauce, reheat the same pan to medium heat.  Add the onion and saute until translucent.  Then add the garlic and saute for 30 more seconds.  Using a wooden spoon, mix everything together and scrape up the browned bits at the bottom of the pan.  Add the tomato puree, parsley, basil, red pepper flakes, black pepper, and salt.  Give the mixture a final stir and add all of the meatballs.  Grate desired amount of parmesan over the meatballs, cover, and reduce heat to medium-low.  Simmer for around 25 minutes, then serve immediately over cooked spaghetti.  Top with grated parmesan, and chopped basil and parsley.


Cheesecake

Whenever you’re craving something sweet but simple, cheesecake is the way to go. If you’ve been to The Cheesecake Factory, you probably know how expensive each slice of cheesecake is, no matter how simple or extraordinarily sweet the flavor is. Instead of spending all your money on just one slice of cheesecake, you can make your own whole cheesecake for just about the same price as one slice from a restaurant like The Cheesecake Factory. This could be your new comfort food to eat when you come home from a long day of classes and just want to forget about school for a moment. My mother would make this a lot when I was younger, so I thought it would be fun to try and make it on my own. I ate the whole thing within a few days and have no regrets. This is super easy to make and you can make it for yourself to enjoy or share it with friends.


Serving size: 12 to 16 servings

Ingredients:

8 oz Kraft Philadelphia fat free cream cheese

½ pint heavy whipping cream

2 tablespoons all-purpose flour

¼ cup of sugar

9 inch Keebler Ready Crust pie crust

2 large eggs


Instructions:

  1. Preheat oven to 350 degrees Fahrenheit.
  2. Mix all the ingredients together in a bowl until there are no more lumps.
  3. Pour the mix into the pie crust.
  4. Put the cheesecake in the oven and bake for 36 minutes.


Michael’s Breakfast Pizza

With 3 growing boys to feed, my mother has always had the challenge of cooking dishes that were easy to make and cheap, yet satisfied the seemingly endless stream of hunger that came from my brothers and I.  The family favorite in our household was undoubtedly pizza. Pizza is delicious, filling, portable, and arguably the king of leftover foods, be it breakfast, lunch, or dinner. However, out of numerous pizzas that my mom made growing up, one in particular stood out to me in regards to its uniqueness and flavor: the breakfast pizza. With the addition of several new toppings, this recipe is a modification of my mother’s classic breakfast pizza recipe. With sweet, crisp peppers, salty, savory meats, and light, fluffy eggs, the large of variety of toppings in this dish creates a complex, yet complimenting flavor experience, giving each bite a unique taste. This dish is excellent for breakfast lovers who want something that is cheap, easy to make, can be eaten on the run, and is great for leftovers. Preheat your oven, grab an apron, and enjoy this unique and delectable twist on pizza!

Total Time: 35 minutes; 25 prep, 10 cook

Serving Size: 3-4

Estimated Cost: $10 per pizza


Ingredients                                                                              Suggested Brands

  • 1, 12-inch (14 OZ) pizza crust                                           Boboli
  • 1, roll (16 OZ) pork sausage                                              Jimmy Dean, Regular
  • 1 pkg. (12 OZ) thick-cut bacon                                         H-E-B
  • 4 Hash Brown Patties                                                        Hill Country Fare
  • 1 tsp canola (vegetable) oil
  • 1 pkg. shredded mexican cheese                                     H-E-B
  • 6 large eggs
  • ¼ cup milk
  • 1 tbsp butter
  • 1 sweet onion
  • 1 bell pepper


Instructions

  1. Preheat oven to 425°F.
  2. A) Blend eggs and milk in a small bowl. B) Heat 1 tbsp of butter in a pan on medium heat until melted. C) Pour egg mixture into pan. As it sets, pull eggs across the pan with a spatula forming soft curds. Continue pulling and folding until thickened and no liquid egg remains. Remove from heat.
  3. In a separate pan, lay out desired quantity of bacon strips. Turn on heat to medium-low and cook bacon slowly to desired crispness, using a spatula to flip fairly constantly. Remove from heat and chop strips into small pieces using a knife on a cutting board.
  1. In a separate pan, add pork sausage. Turn on heat to medium and use spatula to break apart sausage into small, equal size pieces. Cook until brown and remove from heat.
  2. In a separate pan, add canola oil, and spread across the surface. Add hash brown patties, turn on heat to medium-low, and cook patties until brown on both sides, using a spatula to flip. Remove from heat and chop patties into small pieces using a knife on a cutting board.
  3. On a cutting board, dice sweet onion and bell pepper into small pieces.
  4. Place pizza crust onto large baking sheet. First, add eggs, sausage, bacon, hash browns, pepper/onions.     Note: use personal preference when deciding how much of each topping to use. After all toppings have been added, sprinkle a layer of shredded cheese on top.
  5. Bake for 9-11 minutes until cheese has melted and crust is at desired crispness.
  6. Remove from oven, use pizza cutter to cut pizza into 6-8 slices, and enjoy!