Setting up your Omeka account
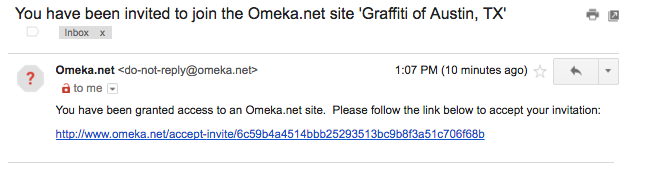
You should have gotten an email inviting you to create an account at Omeka.com. The email looks like this:
This will take you to a screen with a lot of pay options. Ignore those and pick the free option.

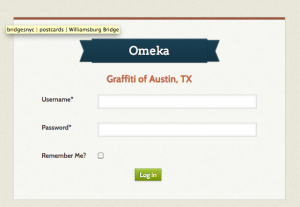
Go to our Omeka archive and log in with your credentials.
After logging in, toggle to your dashboard and click “Manage site“.
Naming your collection
Observe that I have made a collection for your group. Change the name to something your group would like to call their collection of artifact photos. You can choose anything you like, and you can change your name at any time in the data collection process. (I tentatively named my collection “Graffiti, Access, and Erasure.”)
After you’ve named your group’s collection, you can add items to. This is how we will track your group’s contribution to the archive. Make sure you “collect” your group’s contributions in your collection. No item should be hanging out uncollected.
Adding items to your collection

From your dashboard, click “Add item.” This will bring up the data entry screen for a new item.
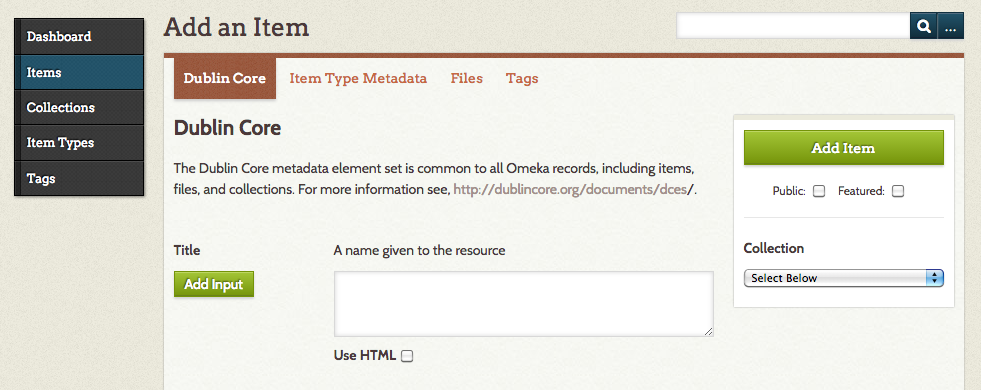
You can look at any of my items to see examples of field input at my collection here. See that there are four categories of data field. You need to fill out each one. Below is a list of the required fields of data for each item you add to our archive. Hypertext gives you a shortcut to best practices instructions for that field further down in this document.
Dublin Core
Item Type Metadata
- Item type (choose still image)
- original format
- physical dimensions (for exhibited items only, all others optional)
- geolocation
- upload at least one image
- assign at least one tag from class list
When you have finished entering your data, you should check the “public” box, select your group’s collection from the drop-down collection menu, and click “add item”. You’ve just entered one item in our archive! Now you’re ready to add it to the class Google map.
Best Practices for Cataloguing Data
Dublin Core.
- If there are legible words, list words first. Preserve caps.
- If there are no legible words, list a 1-2 word description first. Capitalize only proper nouns.
- If there are no legible words or useful descriptors (e.g. illegible graffiti), list the location first.
- List a descriptive type last. Types should be categorical and should match entry in “type” field below. Sample types: tag, mural, wheatpaste, stencil, etching
- Sample titles: “STAY MELLOW wheatpaste” “NINJA STYLE KUNG FU GRIP tag” “3D glasses stencil” “Mopac pedestrian bridge rail etchings”
- Only enter a subject if you collected a group of artifacts at a single location. The location should be listed as the subject to help group the artifacts by site. Example: Mopac pedestrian bridge, HOPE Outdoor Gallery. If subject is applicable, refer to subject heading in description (below) as follows: “See related images under this subject heading.”
- Give a simple, neutral, non-analytical description of the artifact, including potentially useful information about size, location, texture, proximity to other artifacts, etc.. Example: Etchings occur along Mopac pedestrian bridge in its entirety. Etchings occur near wheatpastes affixed to columns supporting Mopac automobile bridge (directly above pedestrian bridge). Pilings are difficult to access. See related images under this subject heading.
- List the creator of the photograph (likely, you).
- List the timestamp on the photograph in long format, e.g. April 17, 2016 10:42 AM.
- Choose the rights you want to reserve for yourself re: your photographic image. Do you want to give permission to others to use it for purposes other than those specified under Fair Use? Answer three simple questions to create a Creative Commons License for your photographic work and refer to it in this entry. I generally use the same license for all of my work (Attribution-Non Commercial 4.0 International).
- If there is text in your artifact, specify what language, if discernible.
- The categorical type of graffiti. Sample types: tag, wheatpaste, etching, stencil, mural
Item Type Metadata.
- Choose still image for standard entry.
- Type “photo” for standard entry.
Physical dimensions. This information is required for exhibited items only. Recording the dimensions for all other entries is optional.
- List the photo-associated GPS data in X, Y format. Use positive X values for N and negative X values for S; likewise, use positive Y values for E and negative Y values for W. Unless you’re planning on leaving this quadrant of the globe, that generally means your GPS coordinates will be [#.#, -#.#]. Do not include brackets. Do not use any other format. Do not round off; leave the long string of decimal points.
- Upload at least one image. Multiple images are acceptable, especially to give a sense of space, view, and/or access.
- Resize images to 1024x968p max. We have a 500 MB space limit on our archive and so we need to be economical with our file sizes. It’s probably a good idea to keep the larger version available in your personal files in case your group or another group needs to request it.
- Preserve highest image resolution possible. Save/export your images as .png or .jpg only.
- Name the file something brief, descriptive, and related to the image title.
- assign at least one tag. Sample tags: installation, deteriorating, tagging, wild style, throw up, etching, erasure